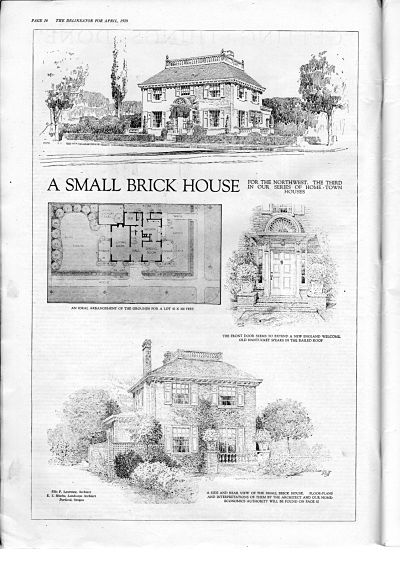
“Sempre Giovine – Pronounced Sem-pray Jo-ve-nay
Meaning Always Young”

Sempre Giovine ad from 1913
Sempre Giovine is one of those products whose ads you are well acquainted with if you spend any time at all looking through old magazines. This particular ad was found in my copy of the September 1913 issue of Ladies’ Home Journal, but similar ads were found all over 100 years ago. Despite this, I never knew much about the product other than that it looked to be a cake of soap.
You will notice that in this ad, a beautiful young woman named Violet MacMillan is quoted as saying “It’s so easy to use Sempre” while she holds the product up to her face. Violet MacMillan was a vaudeville and silent movie actress who was born in Grand Rapids, Michigan. Grand Rapids also happens to be the place where Sempre Giovine began, and its story is an interesting one. I found it on the History of Grand Rapids website, where the Grand Rapids Historical Commission explains:
Nora Carr and Nora Husted, a mother and daughter team, founded a Grand Rapids cosmetics business that lasted over 50 years. In 1886, shortly after Nora Husted and her first husband had divorced, she moved to Grand Rapids from Lowell, Michigan. To earn money and care for her five children she opened a boarding house. To bring in more income, she began to make face cream in her kitchen using an old family recipe. With the help of her children, she sold her products door to door. Later, after marrying James Carr, she sold the boarding house, but kept her business.
The company that Carr founded was called the Marietta-Stanley Company, which you’ll also see listed at the bottom of this ad.
As far as what Sempre Giovine actually is, all that this ad tells us is that “Sem-pre is a product peculiar to itself, distinctly different from other toilet preparations.” In search of more information, I ended up locating the June 7, 1912 edition of the Pittsburgh Press newspaper which has another description:
“This celebrated ‘Little Pink Cake’ is not a soap, cosmetic, cold cream, massage cream or balm. It stands alone as the most marvelous skin cleanser and ‘Youth Restorer’ known to science. A harmonious blend of natural oils, it does not cause hair to grown on the face. It is made by the MARIETTA STANLEY CO. of Grand Rapics, Mich., from a formula used by beautiful women for several generations.”
In 1913 when this ad appeared, the price of a cake of Sempre Giovine was fifty cents.